I'm back on curtain walls again. Sometimes you need to start walking away from an idea to get fresh inspiration.
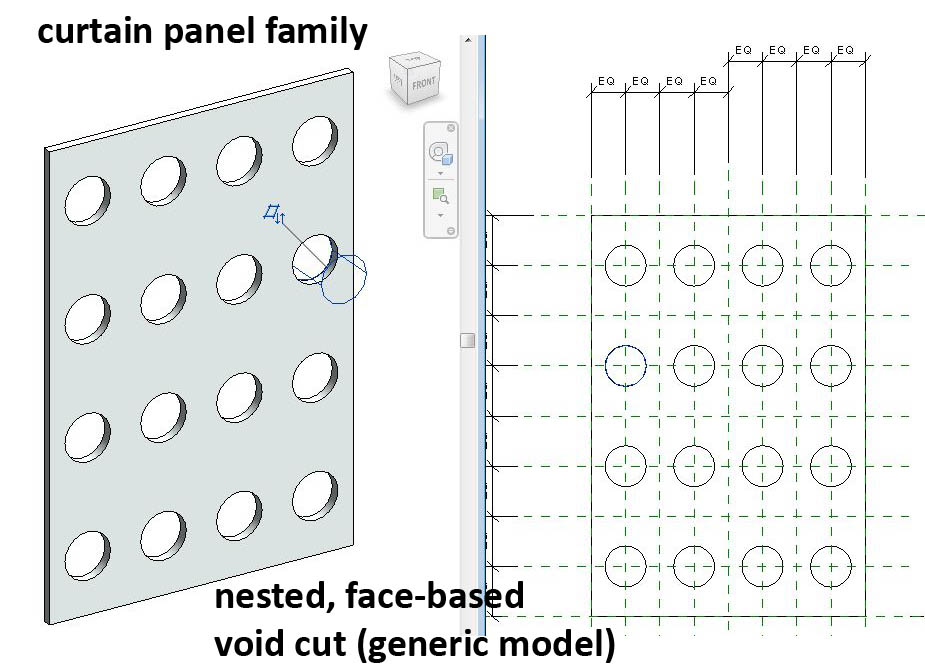
What about a curtain panel family with 16 equally spaced holes ? I used the face-based generic model family template and made a void extrusion with a radius parameter. Nest this into a curtain panel family and link the radius to a matching parameter in the curtain panel, Now we will be able to control the hole sizes from Excel. It has to be an instance parameter, and I also made mine a shared parameter so it can appear in schedules. The void families are all locked to reference planes that have equality constraints.

For my first 2 experiments I am going to use the random function. This makes life easier, because I actually don't need to know exactly where each panel is. I can leave my Excell file as a vertical column and just apply a formula to randomise the values. In this case I wanted 6 different hole sizes and to step up the size by the same interval each time. The formula is quite simple, and flexible too. I can change the number of different panels by changing one of the two fixed cells which are referenced. Notice the use of the dollar symbol to indicate a fixed reference rather than a relative link.
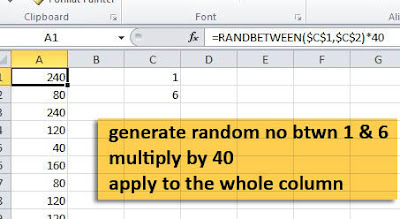
If I had been a bit more careful, I could have put the value "40" into a fixed reference cell also. Then I would be able to easily vary the amount by which the radius of the hole is successively increased. How carefully you set up the formula has a big influence on the ease with which you can explore different design iterations.

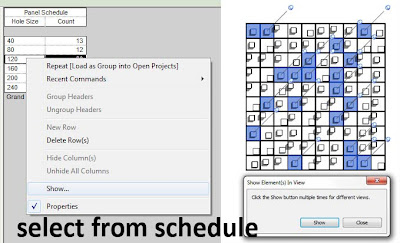
It's easy to make a schedule that displays the hole size and number of instances for each panel "type" (They are not types in the Revit sense of the word) You can also use a schedule to select a group of panels, right click and "show". Cycle through avaiable views, use temporary isolation if you like, and change the material of a group of panels based on hole size.

The second experiment doesn't require any more work in excel. I just want to change the shape of the holes. I copied the generic model void family with a different name so I can keep both versions in my curtain panel family. Then I just select all instances and swop between the families. They will remain locked to the reference planes, but you need to repeat the parameter linking.
Load it back in and we get the same random effect, but with square holes. I didn't change the name of the curtain panel family because that would have messed up all the instance values for the hole sizes.

That's enough randomising. What about a diagonal gradient ? The curtain panel is based on one that I did for my first Excel post, so it already has X & Y values. These are just text fields (instance parameters) that allow me to identify the position of each panel in the horizontal and vertical grid.
It's a bit tedious, but once done gives you much more control. Select the first vertical row and label it A, do this ten times using B, C, D etc. Now select horizontal lines and label them 1 to 10. By using separate parameters we only needed to make 20 selections to label 100 panels.

Now export to excel. You need to do a custom sort on the data. This requires unprotecting the worksheet. (Review tab) You will need a password. You can set this during the process of exporting to excel. Select all the data (blue and white), but not the grey headings. Do a two level sort: first alphabetic on the X values, then numeric on the Y values. The data is now organised in blocks of ten that match the vertical rows of the curtain wall.
Now we set up a rectangular array in another worksheet and link the columns to the equivalent blocks in our vertical data stream. If you want to use Excel with Revit, you need to practice your linking skills. Set up the first link in the top left corner. Must be relative. Then propagate it down to all 10 cells in the A column. Now do the same thing for B, etc. Maybe some excel genius can come up with a macro that automates this process.

You will also need to hone your formula writing abilities. Once again, I set out to place key values as fixed references. This one works, but I end up with a lot of different panel types which may not be cost effective. I case you are worried that the diagonal gradtient is reversed in the rendering, it's simple, we are viewing the wall from the other side.

Some adjustments in excel reduce the number of different panel types.

But the visual effect of a continuous gradient is not really affected.

The next experiment returned to random patterns but using a panel based on a blend.

Within the Revit family I set up simple formulae to tie the positon, & size of the top rectangle to the same parameter controlling the depth of projection. This is a second iteration which swops in two extrusions in place of the single blend.

Which works better as a random pattern.

Once again I have just 6 different panel variations and I can use a schedule to select them and apply materials. Remember these are not true Revit types. We are using instance parameters throughout for the Revit Excel Link method to work.
So we have a range of techniques for generating variety, based on Excel linking, use of family editore & selecting panels via schedules.

Here is a version of the squares using the gradient formula in excel. It gives quite a subtle effect

Finally back to the blend. This time using the gradient effect, and introducing a void sweep around the top edge. This has an interesting and unanticipated effect.

As the angle of the pyramids becomes shallower towards the top left corner, the shelf created by this void sweep becomes much broader very rapidly.

What about a curtain panel family with 16 equally spaced holes ? I used the face-based generic model family template and made a void extrusion with a radius parameter. Nest this into a curtain panel family and link the radius to a matching parameter in the curtain panel, Now we will be able to control the hole sizes from Excel. It has to be an instance parameter, and I also made mine a shared parameter so it can appear in schedules. The void families are all locked to reference planes that have equality constraints.
For my first 2 experiments I am going to use the random function. This makes life easier, because I actually don't need to know exactly where each panel is. I can leave my Excell file as a vertical column and just apply a formula to randomise the values. In this case I wanted 6 different hole sizes and to step up the size by the same interval each time. The formula is quite simple, and flexible too. I can change the number of different panels by changing one of the two fixed cells which are referenced. Notice the use of the dollar symbol to indicate a fixed reference rather than a relative link.

If I had been a bit more careful, I could have put the value "40" into a fixed reference cell also. Then I would be able to easily vary the amount by which the radius of the hole is successively increased. How carefully you set up the formula has a big influence on the ease with which you can explore different design iterations.

It's easy to make a schedule that displays the hole size and number of instances for each panel "type" (They are not types in the Revit sense of the word) You can also use a schedule to select a group of panels, right click and "show". Cycle through avaiable views, use temporary isolation if you like, and change the material of a group of panels based on hole size.

The second experiment doesn't require any more work in excel. I just want to change the shape of the holes. I copied the generic model void family with a different name so I can keep both versions in my curtain panel family. Then I just select all instances and swop between the families. They will remain locked to the reference planes, but you need to repeat the parameter linking.
Load it back in and we get the same random effect, but with square holes. I didn't change the name of the curtain panel family because that would have messed up all the instance values for the hole sizes.

That's enough randomising. What about a diagonal gradient ? The curtain panel is based on one that I did for my first Excel post, so it already has X & Y values. These are just text fields (instance parameters) that allow me to identify the position of each panel in the horizontal and vertical grid.
It's a bit tedious, but once done gives you much more control. Select the first vertical row and label it A, do this ten times using B, C, D etc. Now select horizontal lines and label them 1 to 10. By using separate parameters we only needed to make 20 selections to label 100 panels.

Now export to excel. You need to do a custom sort on the data. This requires unprotecting the worksheet. (Review tab) You will need a password. You can set this during the process of exporting to excel. Select all the data (blue and white), but not the grey headings. Do a two level sort: first alphabetic on the X values, then numeric on the Y values. The data is now organised in blocks of ten that match the vertical rows of the curtain wall.
Now we set up a rectangular array in another worksheet and link the columns to the equivalent blocks in our vertical data stream. If you want to use Excel with Revit, you need to practice your linking skills. Set up the first link in the top left corner. Must be relative. Then propagate it down to all 10 cells in the A column. Now do the same thing for B, etc. Maybe some excel genius can come up with a macro that automates this process.

You will also need to hone your formula writing abilities. Once again, I set out to place key values as fixed references. This one works, but I end up with a lot of different panel types which may not be cost effective. I case you are worried that the diagonal gradtient is reversed in the rendering, it's simple, we are viewing the wall from the other side.

Some adjustments in excel reduce the number of different panel types.

But the visual effect of a continuous gradient is not really affected.

The next experiment returned to random patterns but using a panel based on a blend.

Within the Revit family I set up simple formulae to tie the positon, & size of the top rectangle to the same parameter controlling the depth of projection. This is a second iteration which swops in two extrusions in place of the single blend.

Which works better as a random pattern.

Once again I have just 6 different panel variations and I can use a schedule to select them and apply materials. Remember these are not true Revit types. We are using instance parameters throughout for the Revit Excel Link method to work.

So we have a range of techniques for generating variety, based on Excel linking, use of family editore & selecting panels via schedules.

Here is a version of the squares using the gradient formula in excel. It gives quite a subtle effect

Finally back to the blend. This time using the gradient effect, and introducing a void sweep around the top edge. This has an interesting and unanticipated effect.

As the angle of the pyramids becomes shallower towards the top left corner, the shelf created by this void sweep becomes much broader very rapidly.

This comment has been removed by the author.
ReplyDelete